Datagenerator
Datagenerator is a utility to populate,create and load tables with random or static data. Users can specify, sequences, random text, random numbers, database columns and files as sources for tables. It can be downloaded here.
Data Generator will create the table definition statements (DDL) and the control files for SQL Loader, or insert data directly into the database using batch inserts and asynchronous commits. Datagenerator provides both a graphical front end (default) or a command line version invoked with the -cl command line option.
Installation and Configuration
Installation of data generator is very straight forward. After downloading Datagenerator from here, simply unzip it into you target directory using a command such as
unzip datagenerator.zip
As long as you have a Java Virtual machine, Oracle or OpenJDK (version 8 and above), on the target machine you should be able to simply start datagenerator by changing into the bin or winbin (On Windows) and invoking a command such as
./datagenerator
or on Windows
datagenerator.bat
Whilst everything necessary is contained in the supplied zip file if you intend to use native OCI drivers you’ll need to make sure that the paths and environment variables are set correctly before invoking data generator. When using OCI drivers, Datagenerator will work with either Oracle instant client of a full Oracle Client install.
Using Datagenerator
To start datagenerator in Unix/Linux simply issue the following command
cd datagenerator/bin
./datagenerator
In Windows (simply double click the datagenerator.bat icon in the winbin directory)
cd datagenerator/winbin
datagenerator.bat
This will launch datagenerator
By default datagenerator will use a file datagenerator.xml file located in the bin directory this can be overridden with the -c command line option.
Press the new file icon to create a new profile.

Reverse Engineering Data
To reverse engineer tables within a schema. Press the reverse engineering wizard icon to reverse engineer a database schema,

This will launch the following window
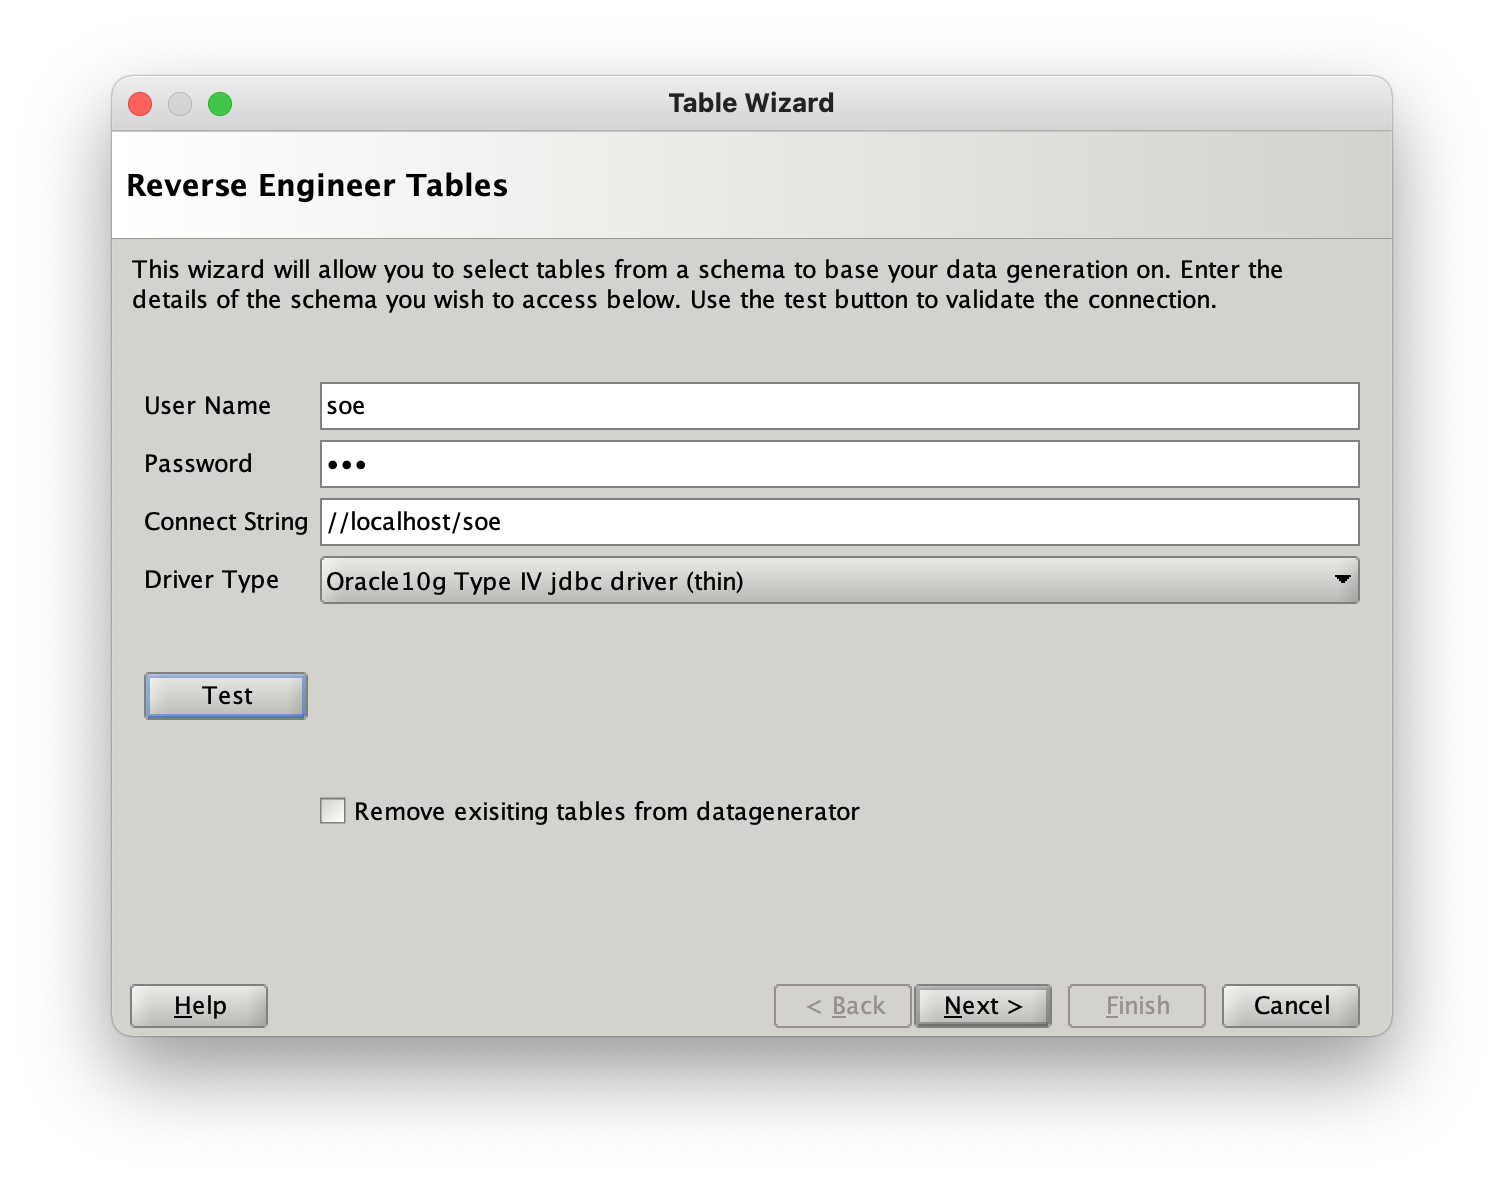
Enter your user details and hit “Test” button to validate your connection details.
The connection string will be of the form
- Thin (pure java)
//<hostname>:<port>/<service>or<hostname>:<port>:<service>i.e//node1:1521/RAC(NOTE : the use of the port is optional) - OCI (java callout to Oracle’s oci layer)
//<hostname>:<service>or tnsnames entry i.e//node1/RAC
NOTE : To remove all of the existing table entries in the profile on completion of the reverse engineering wizard select the checkbox.
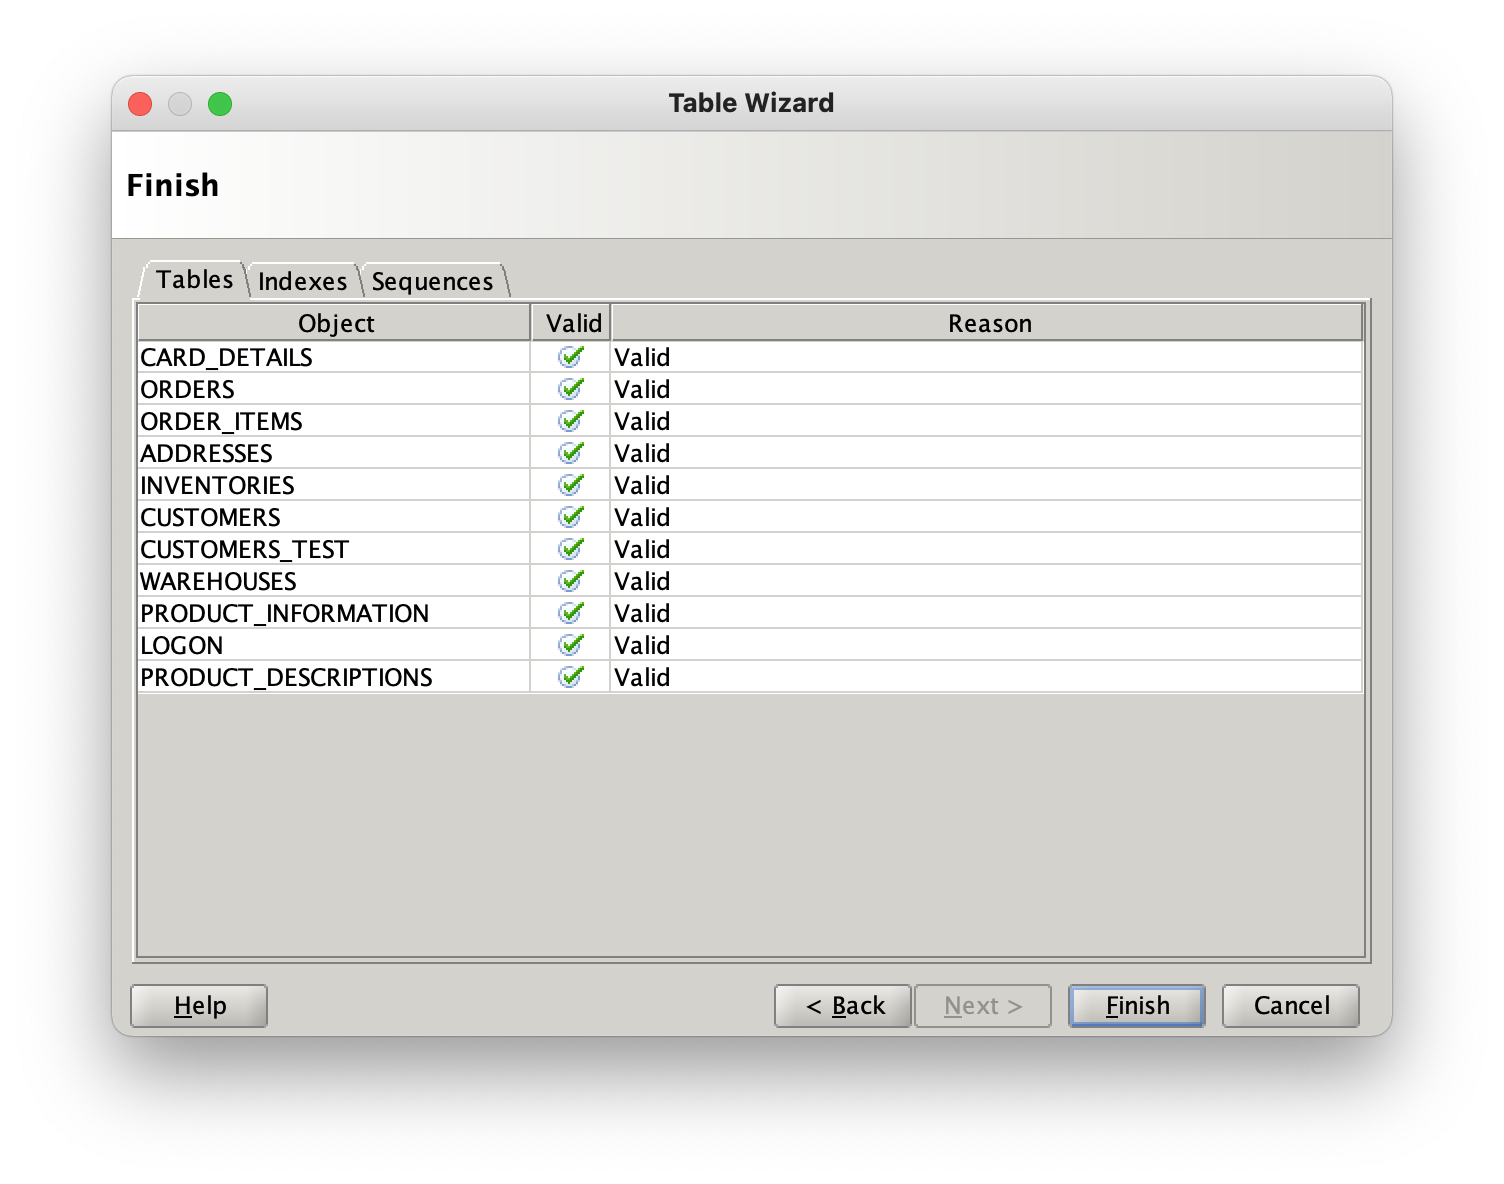
When the next button is pressed the wizard will show tables that can be selected to build a datagenerator configuration with…
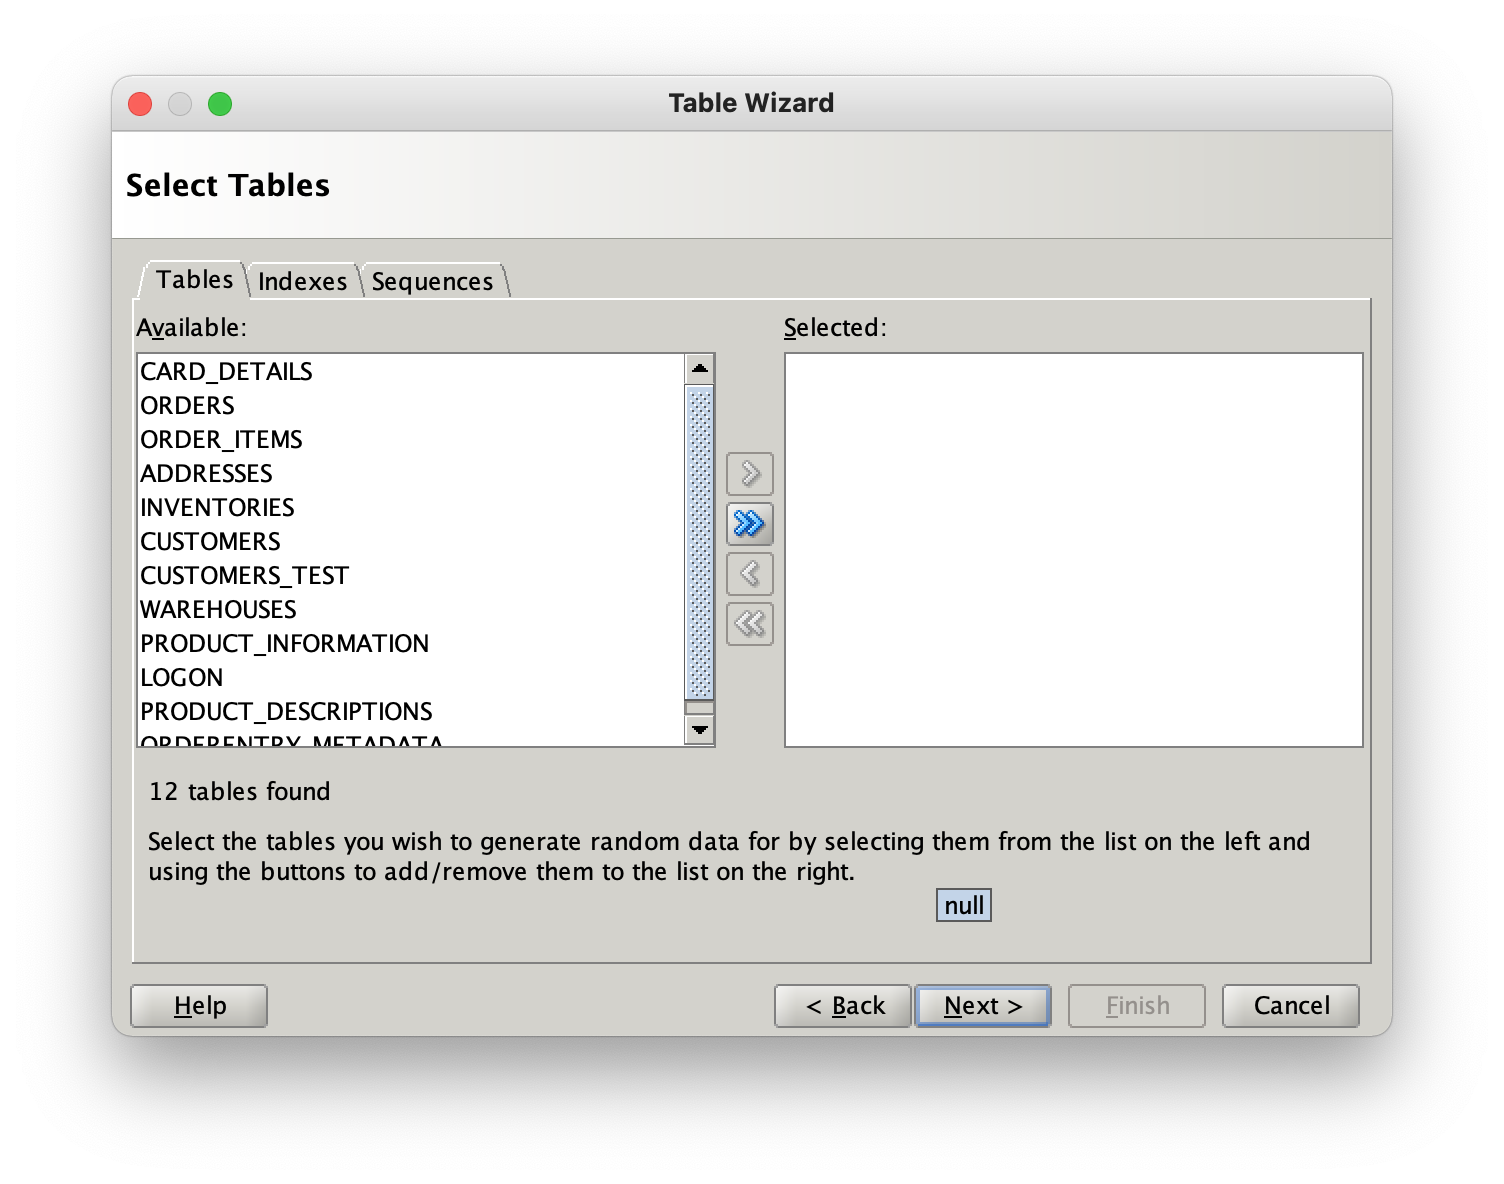
Select the tables your interested in from the left hand column and move them to the right hand side, either by using the buttons or dragging them across, then press the next button.
Datagenerator will validate the tables columns to determine if it supports their data types.
After pressing “Datagenerator will create a profile with default generators for each column based on their data type. At this stage you can refine the ratios of the data or the values that will generated for the columns.

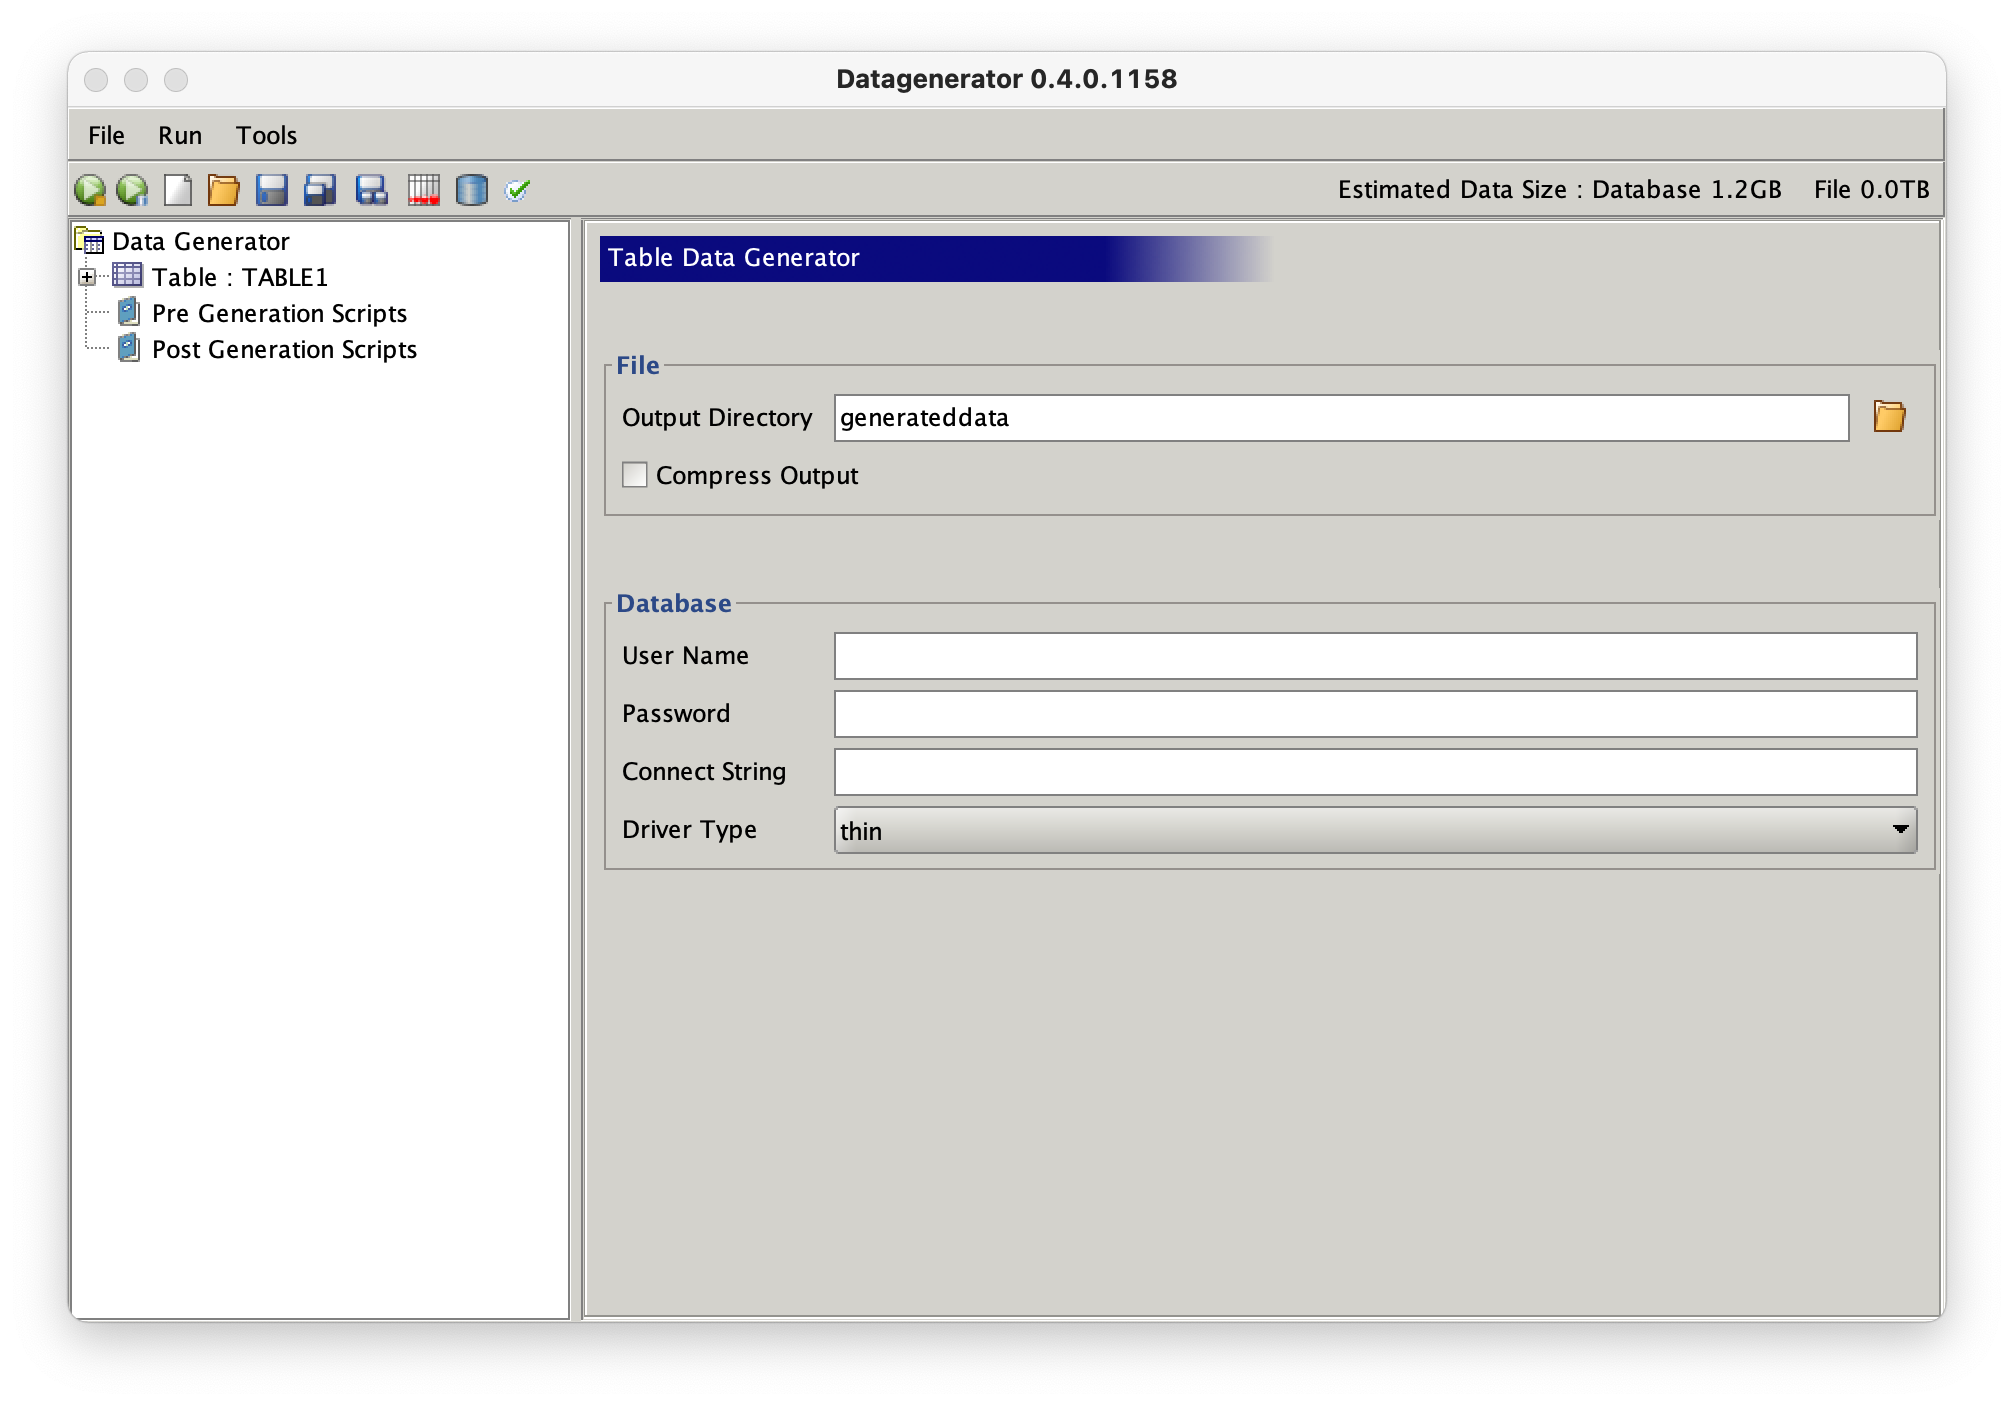
After you’ve refined the columns, ratios and datagenerators. You can generate a data run by pressing the icon.

This will launch the following window
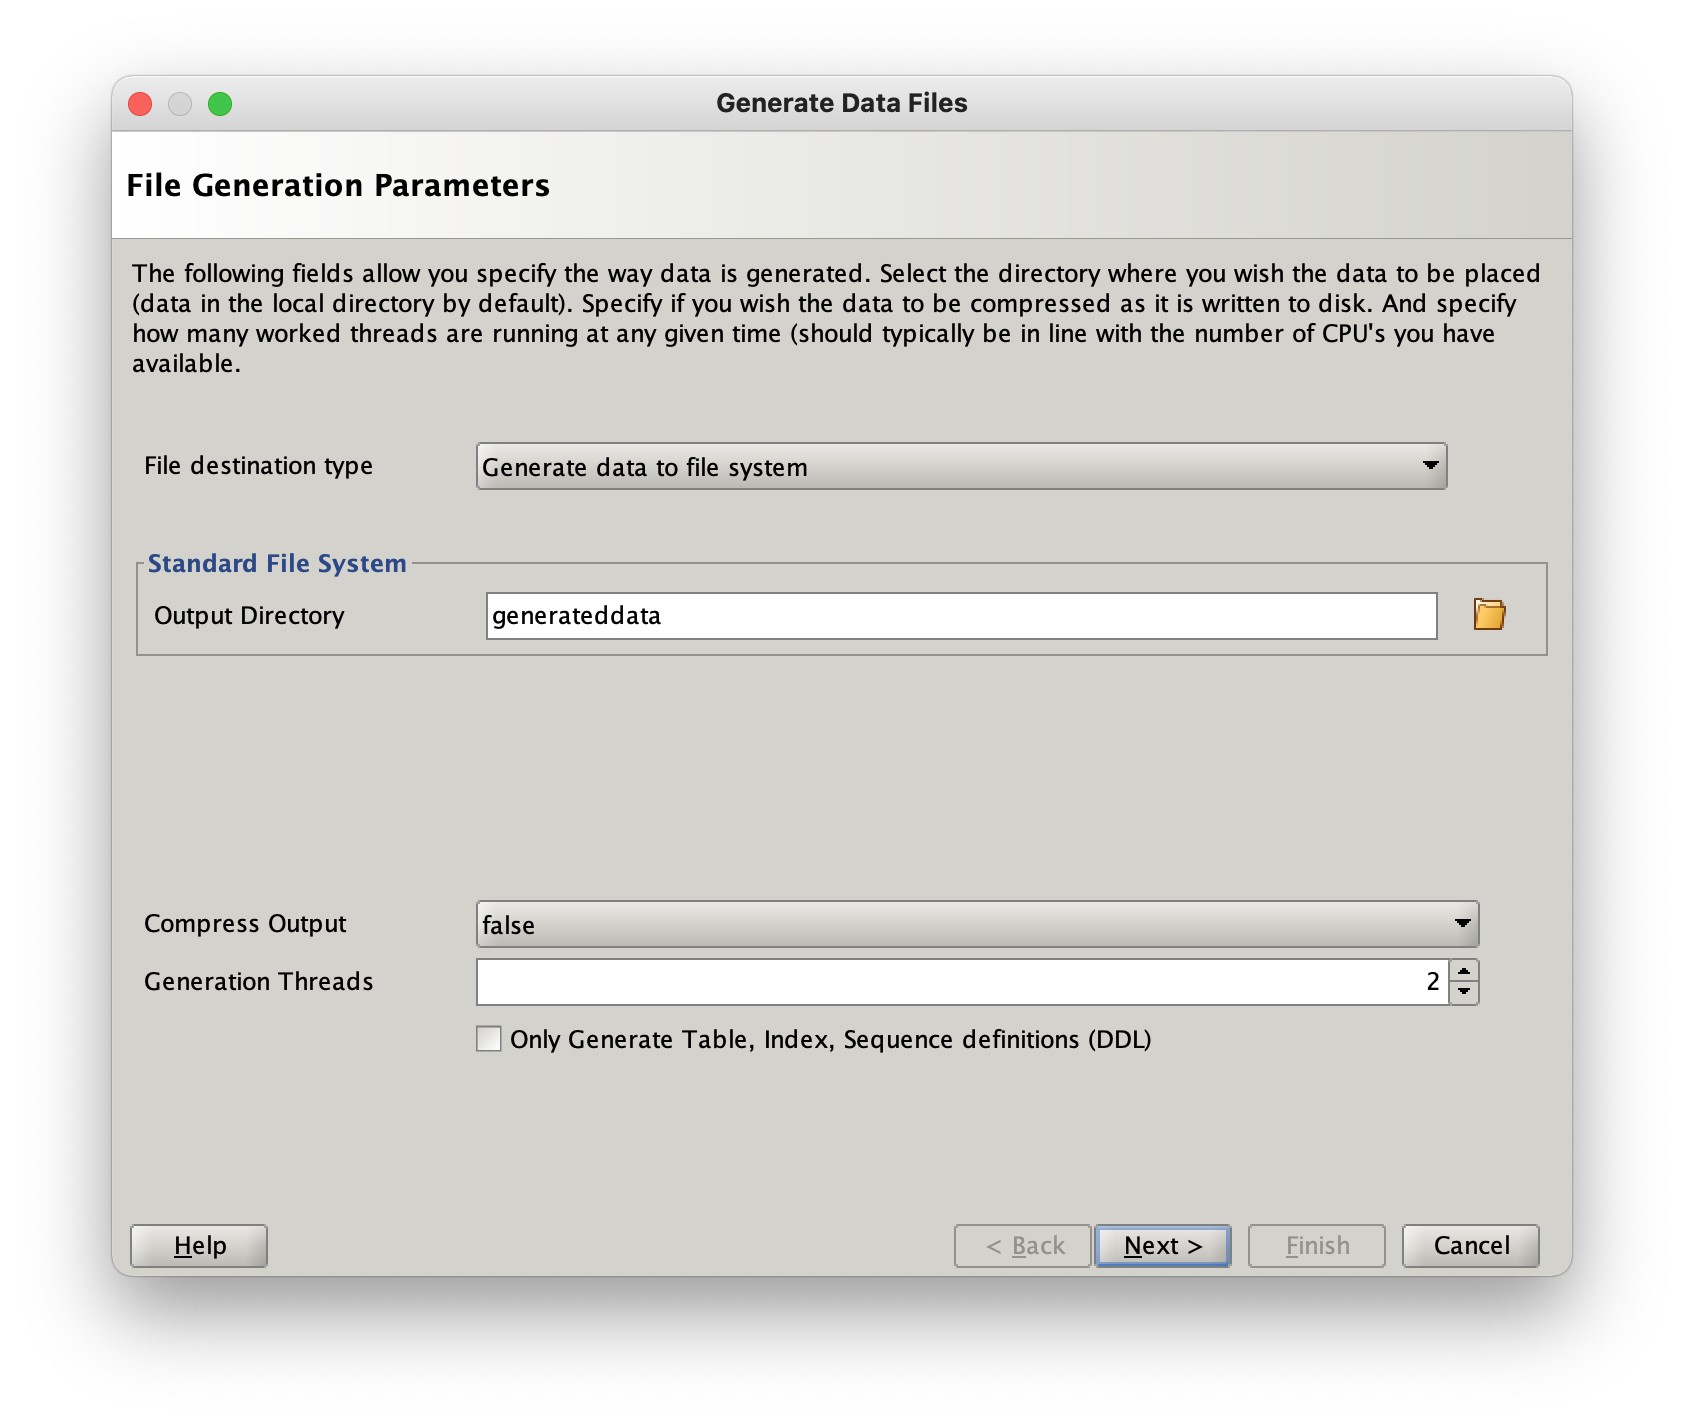
You can modify the level of parallelism and directories where the files will be placed. When you’re happy with the values press the “Next” button and the data generation will begin.
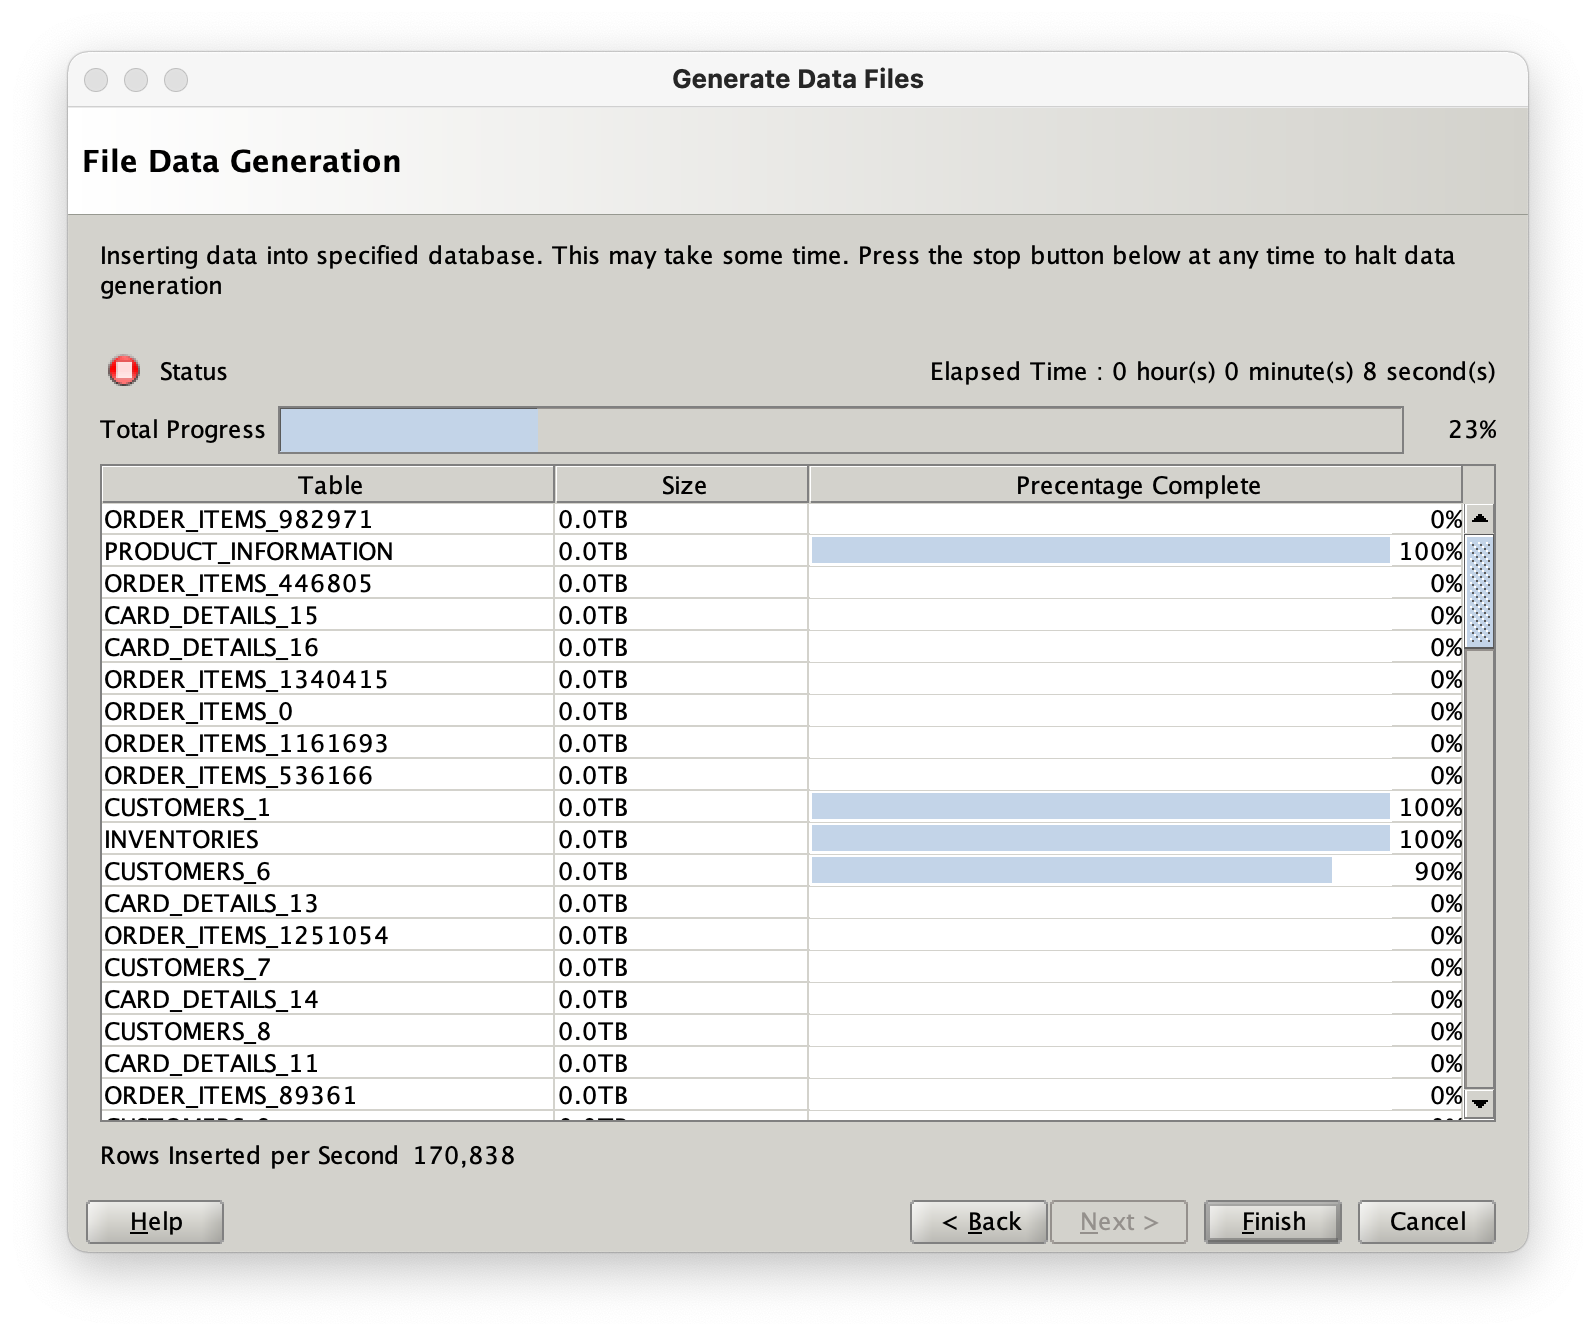
It will create a directory with the following files with in it
| File Type | Description |
|---|---|
| Table data files in comma separated format | |
| The control files for sqlldr to load a file into the database | |
| createtables.sql | SQL script used to create table definitions |
| constraints.sql | SQL script containing constraint definitions |
| indexes.sql | SQL script containing index definitions |
| droptables.sql | SQL script used to drop tables |
| metadata.json | Data about all of the files generated in JSON format |
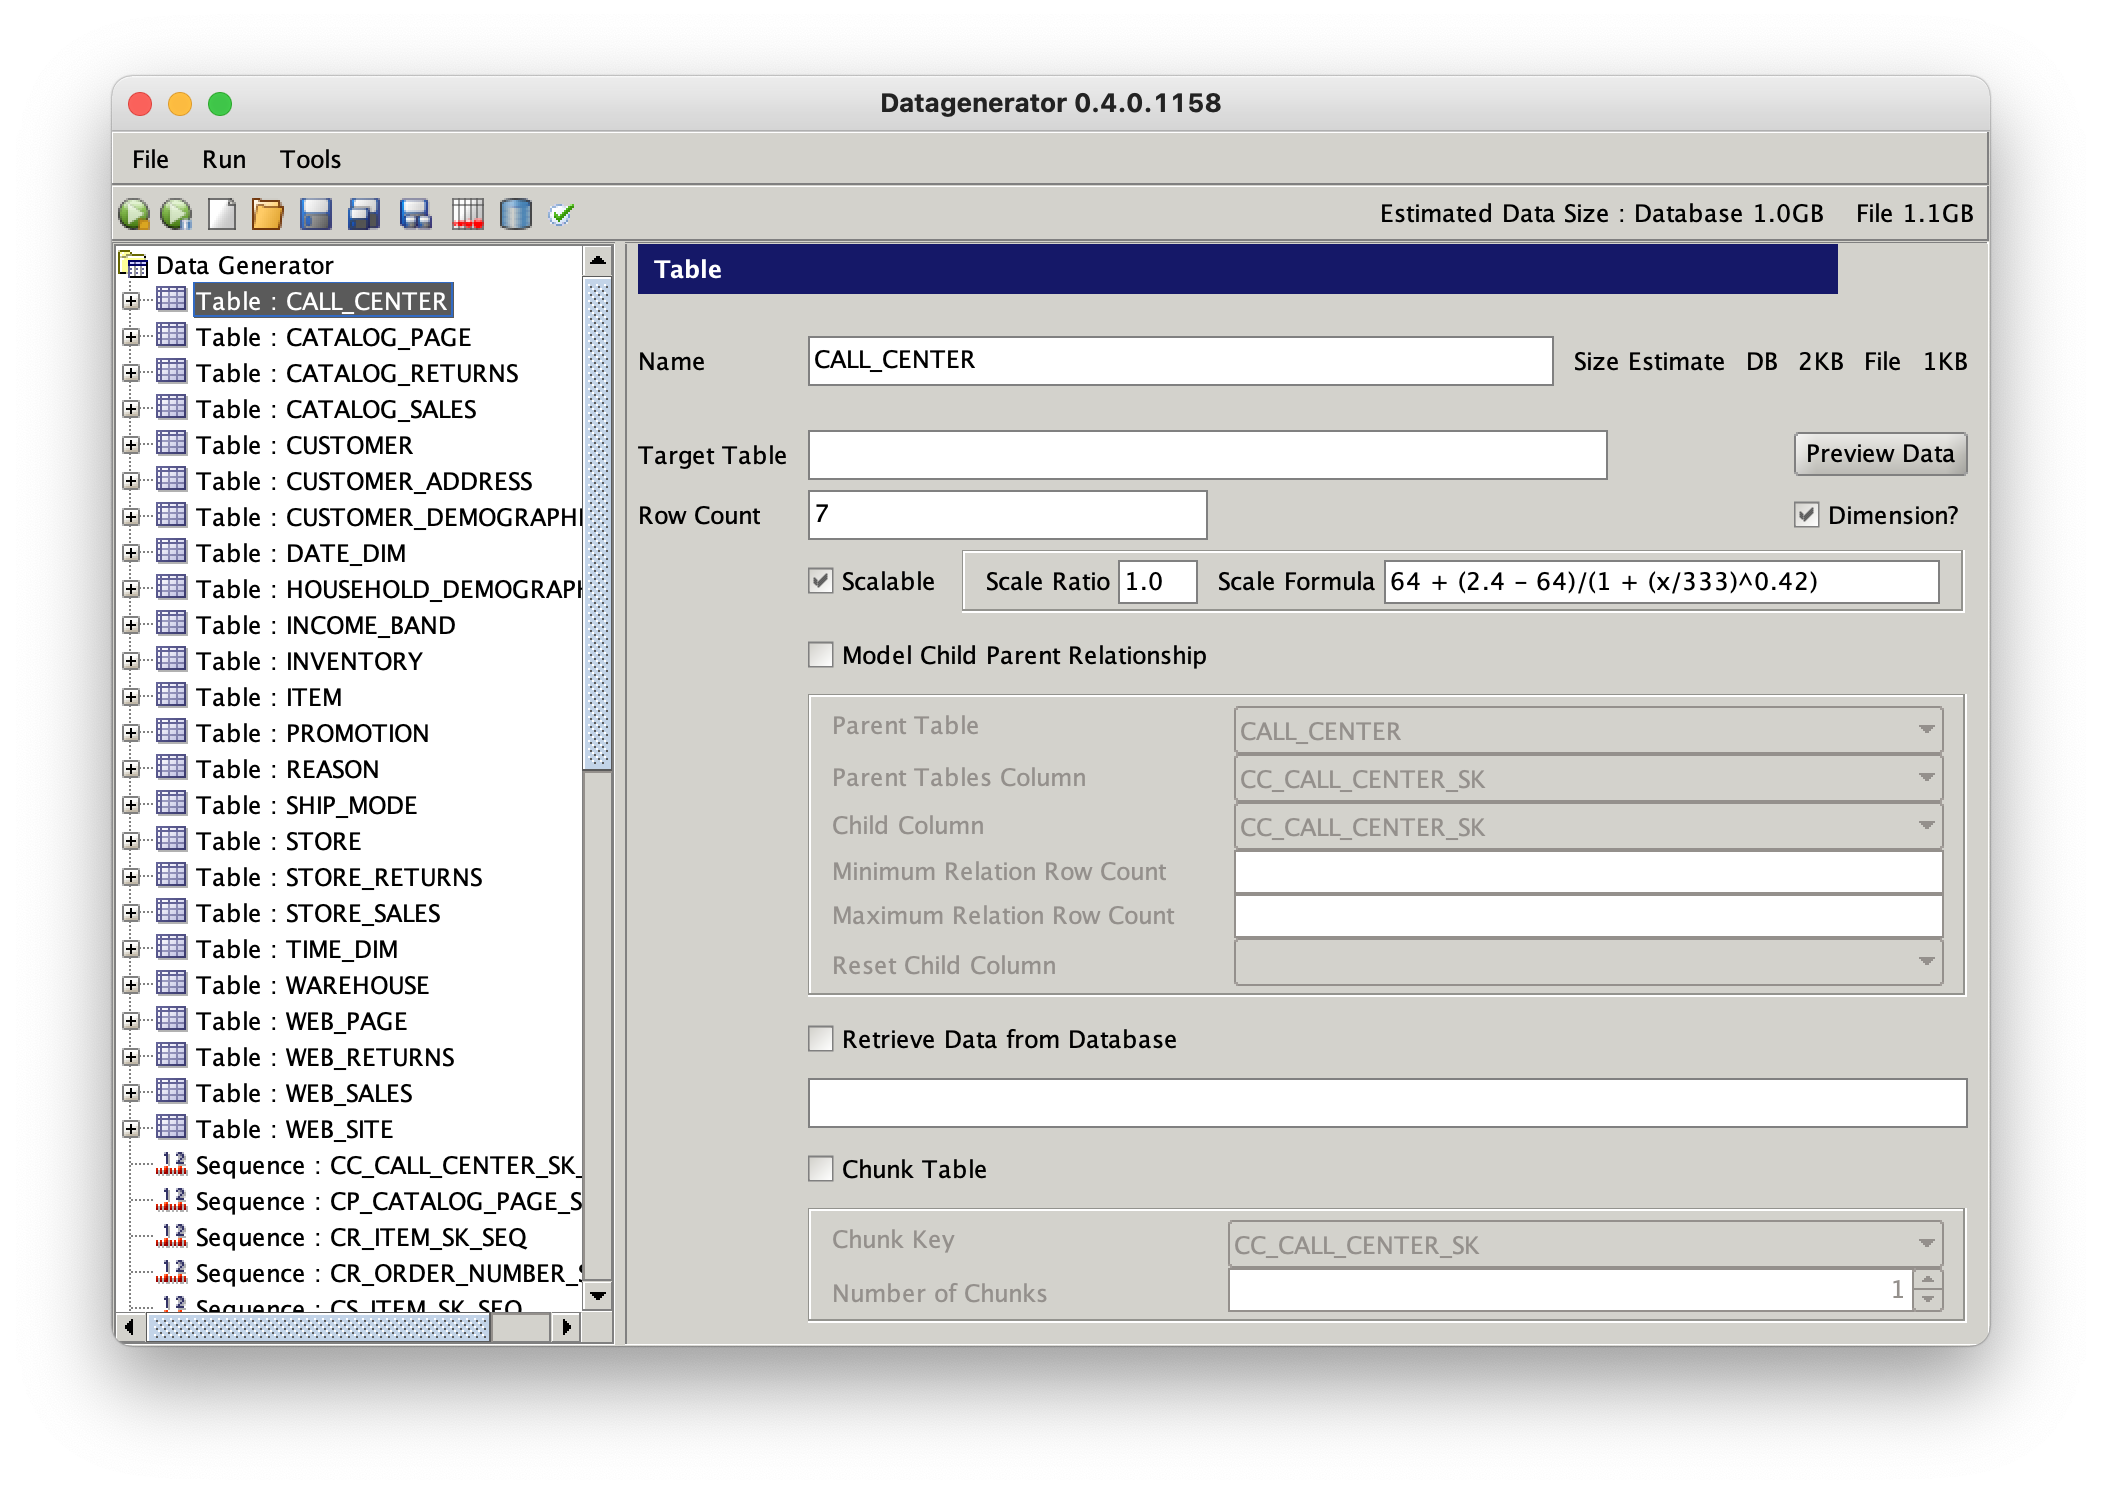
Refining Table Definitions
It’s likely that you may want to refine a tables definition a little further. In the following example we’ll use the customers table. Expand the customers table by pressing on the “+”
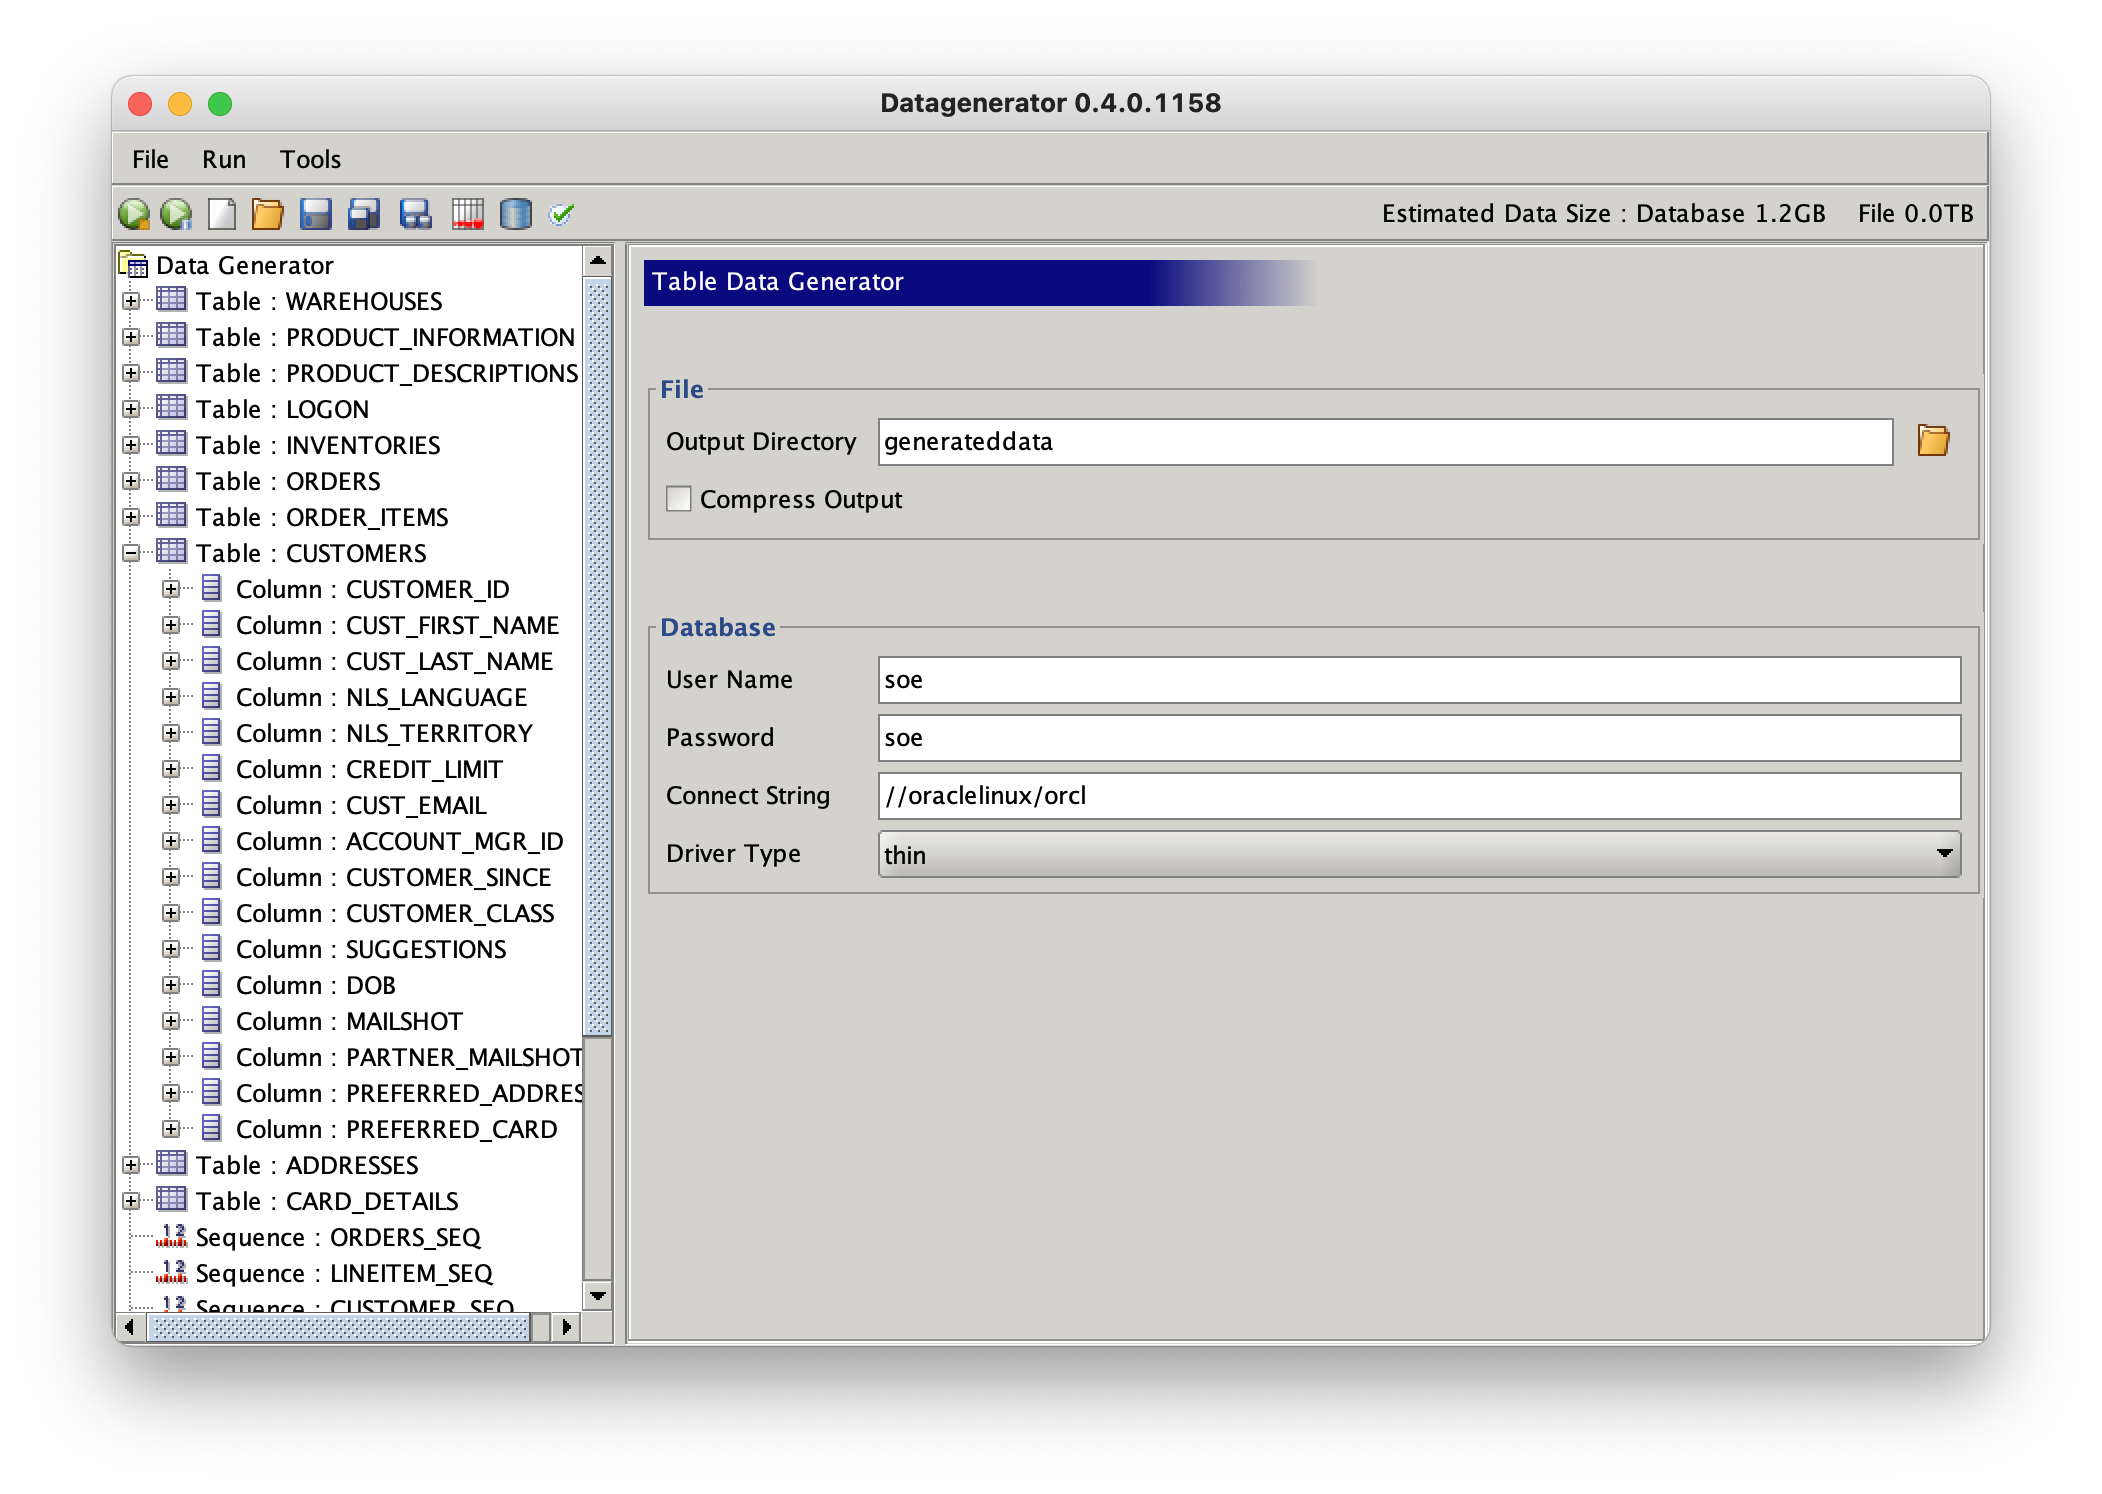
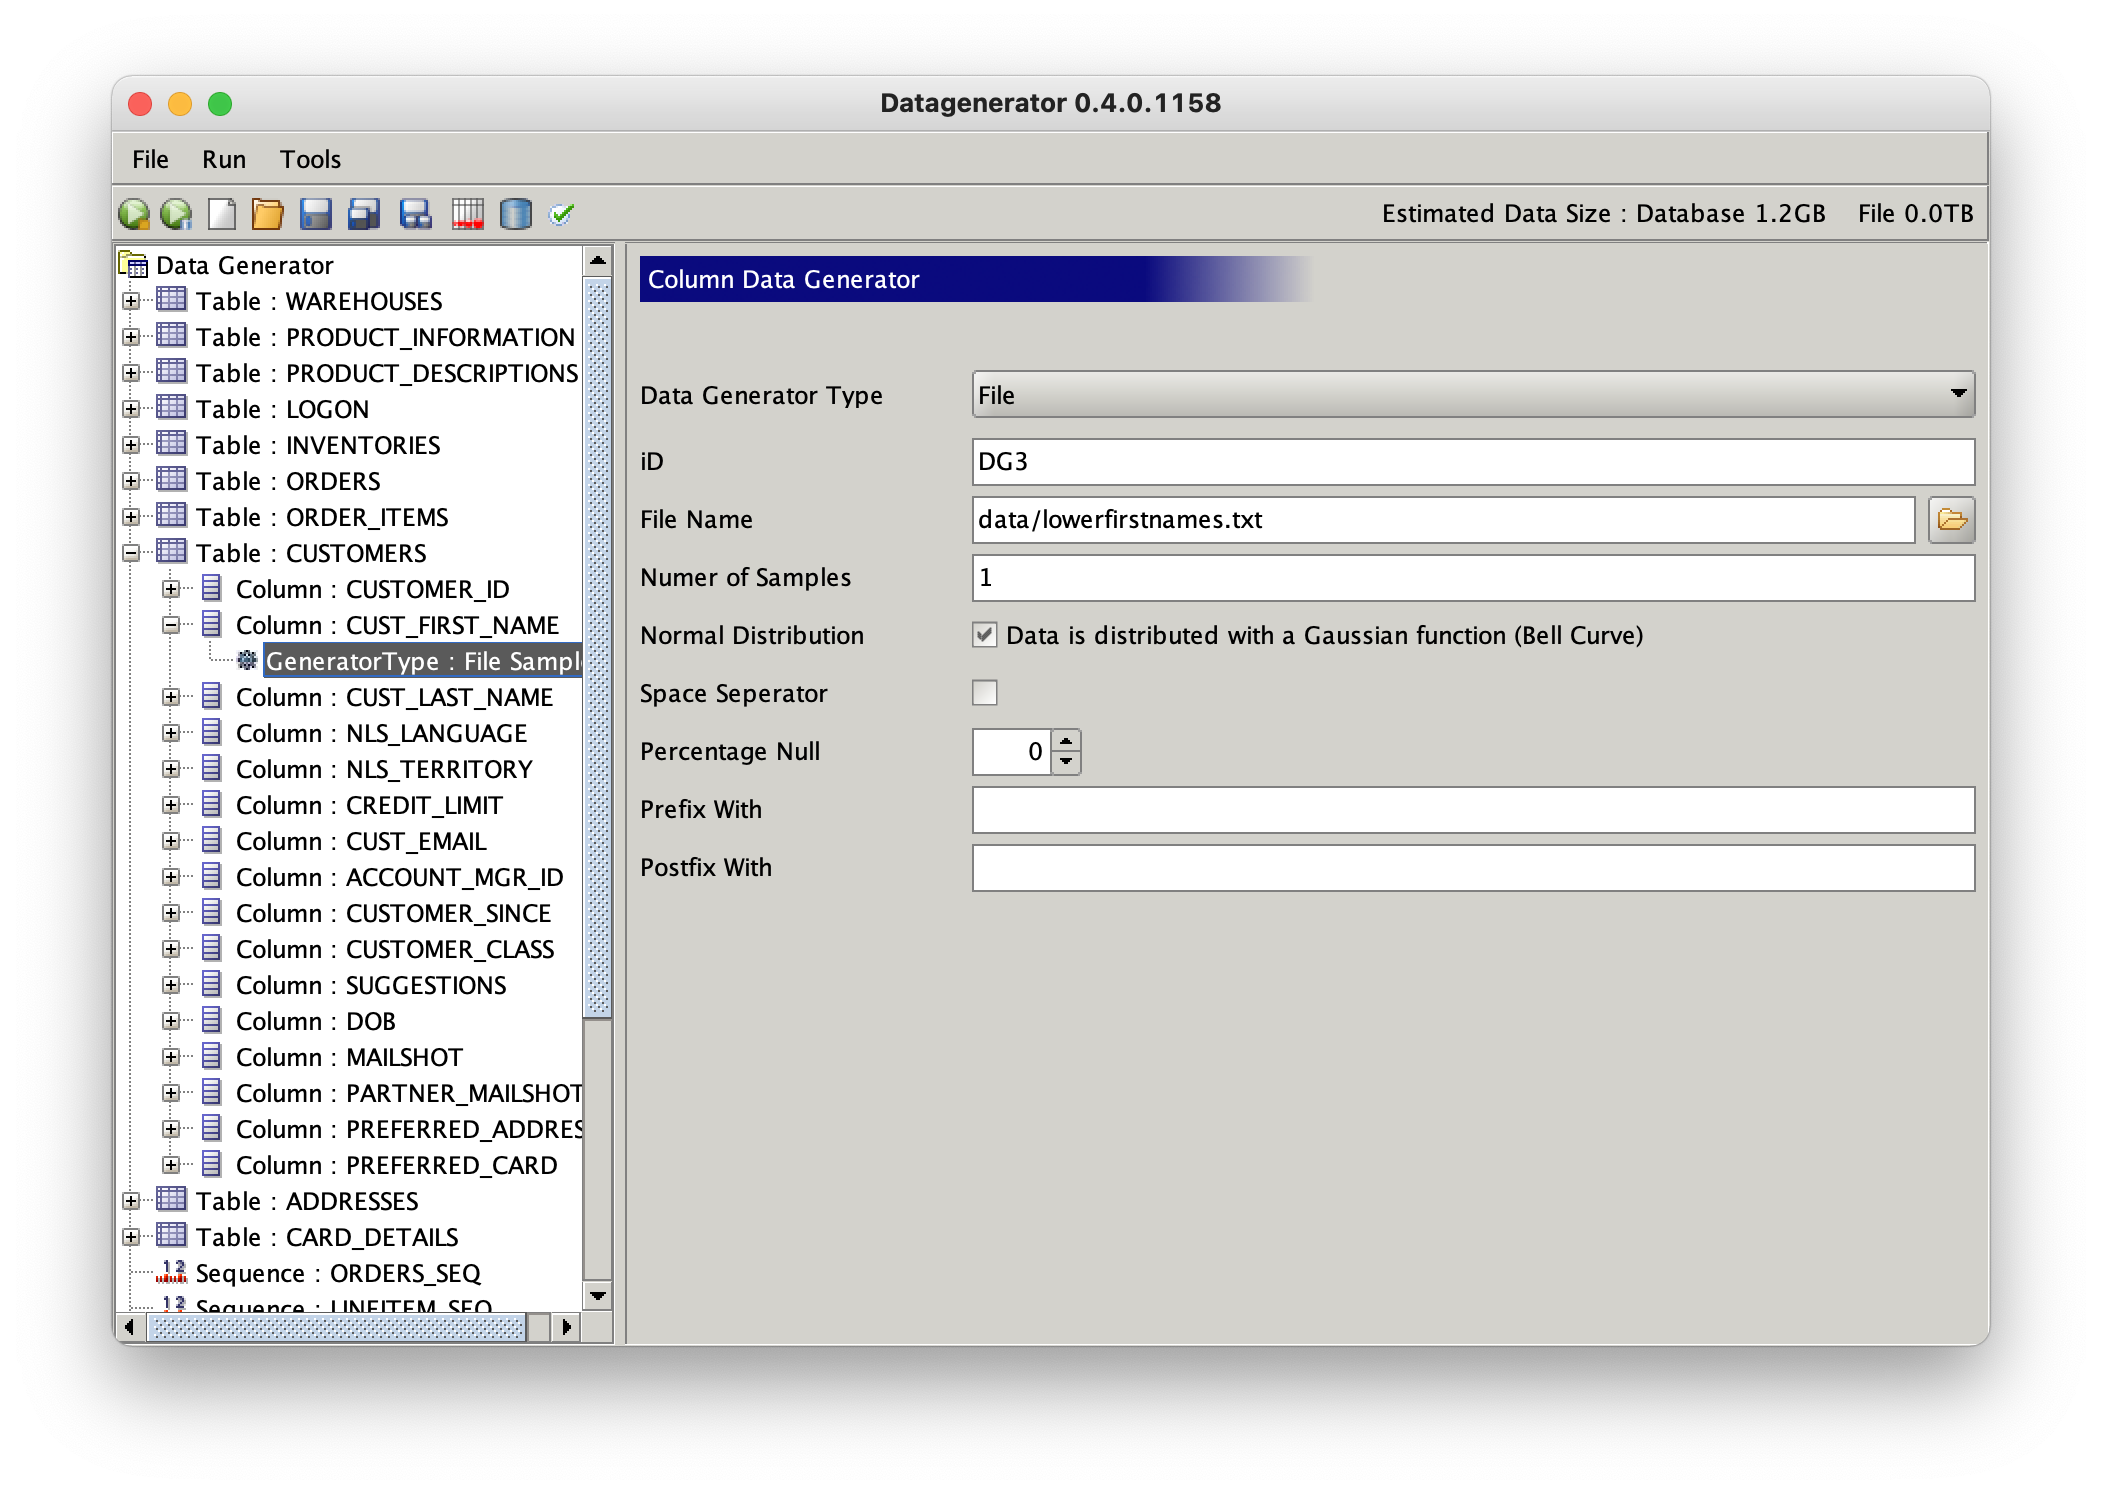
Select the first cust_first_name column and expand it further with the “+”. This will display its default generator of type text. We can change this type to a more realistic data set by using a file of “typical” data. Datagenerator ships with some simple sample data which we can use to populate this column with. It will create the list in memory and randomly select one. Change the datagenerator type to file. The sample data is located in the sample directory of the bin or winbin directory. Select the “lowerfirstnames.txt” file. You should end up with a form that looks similar to this
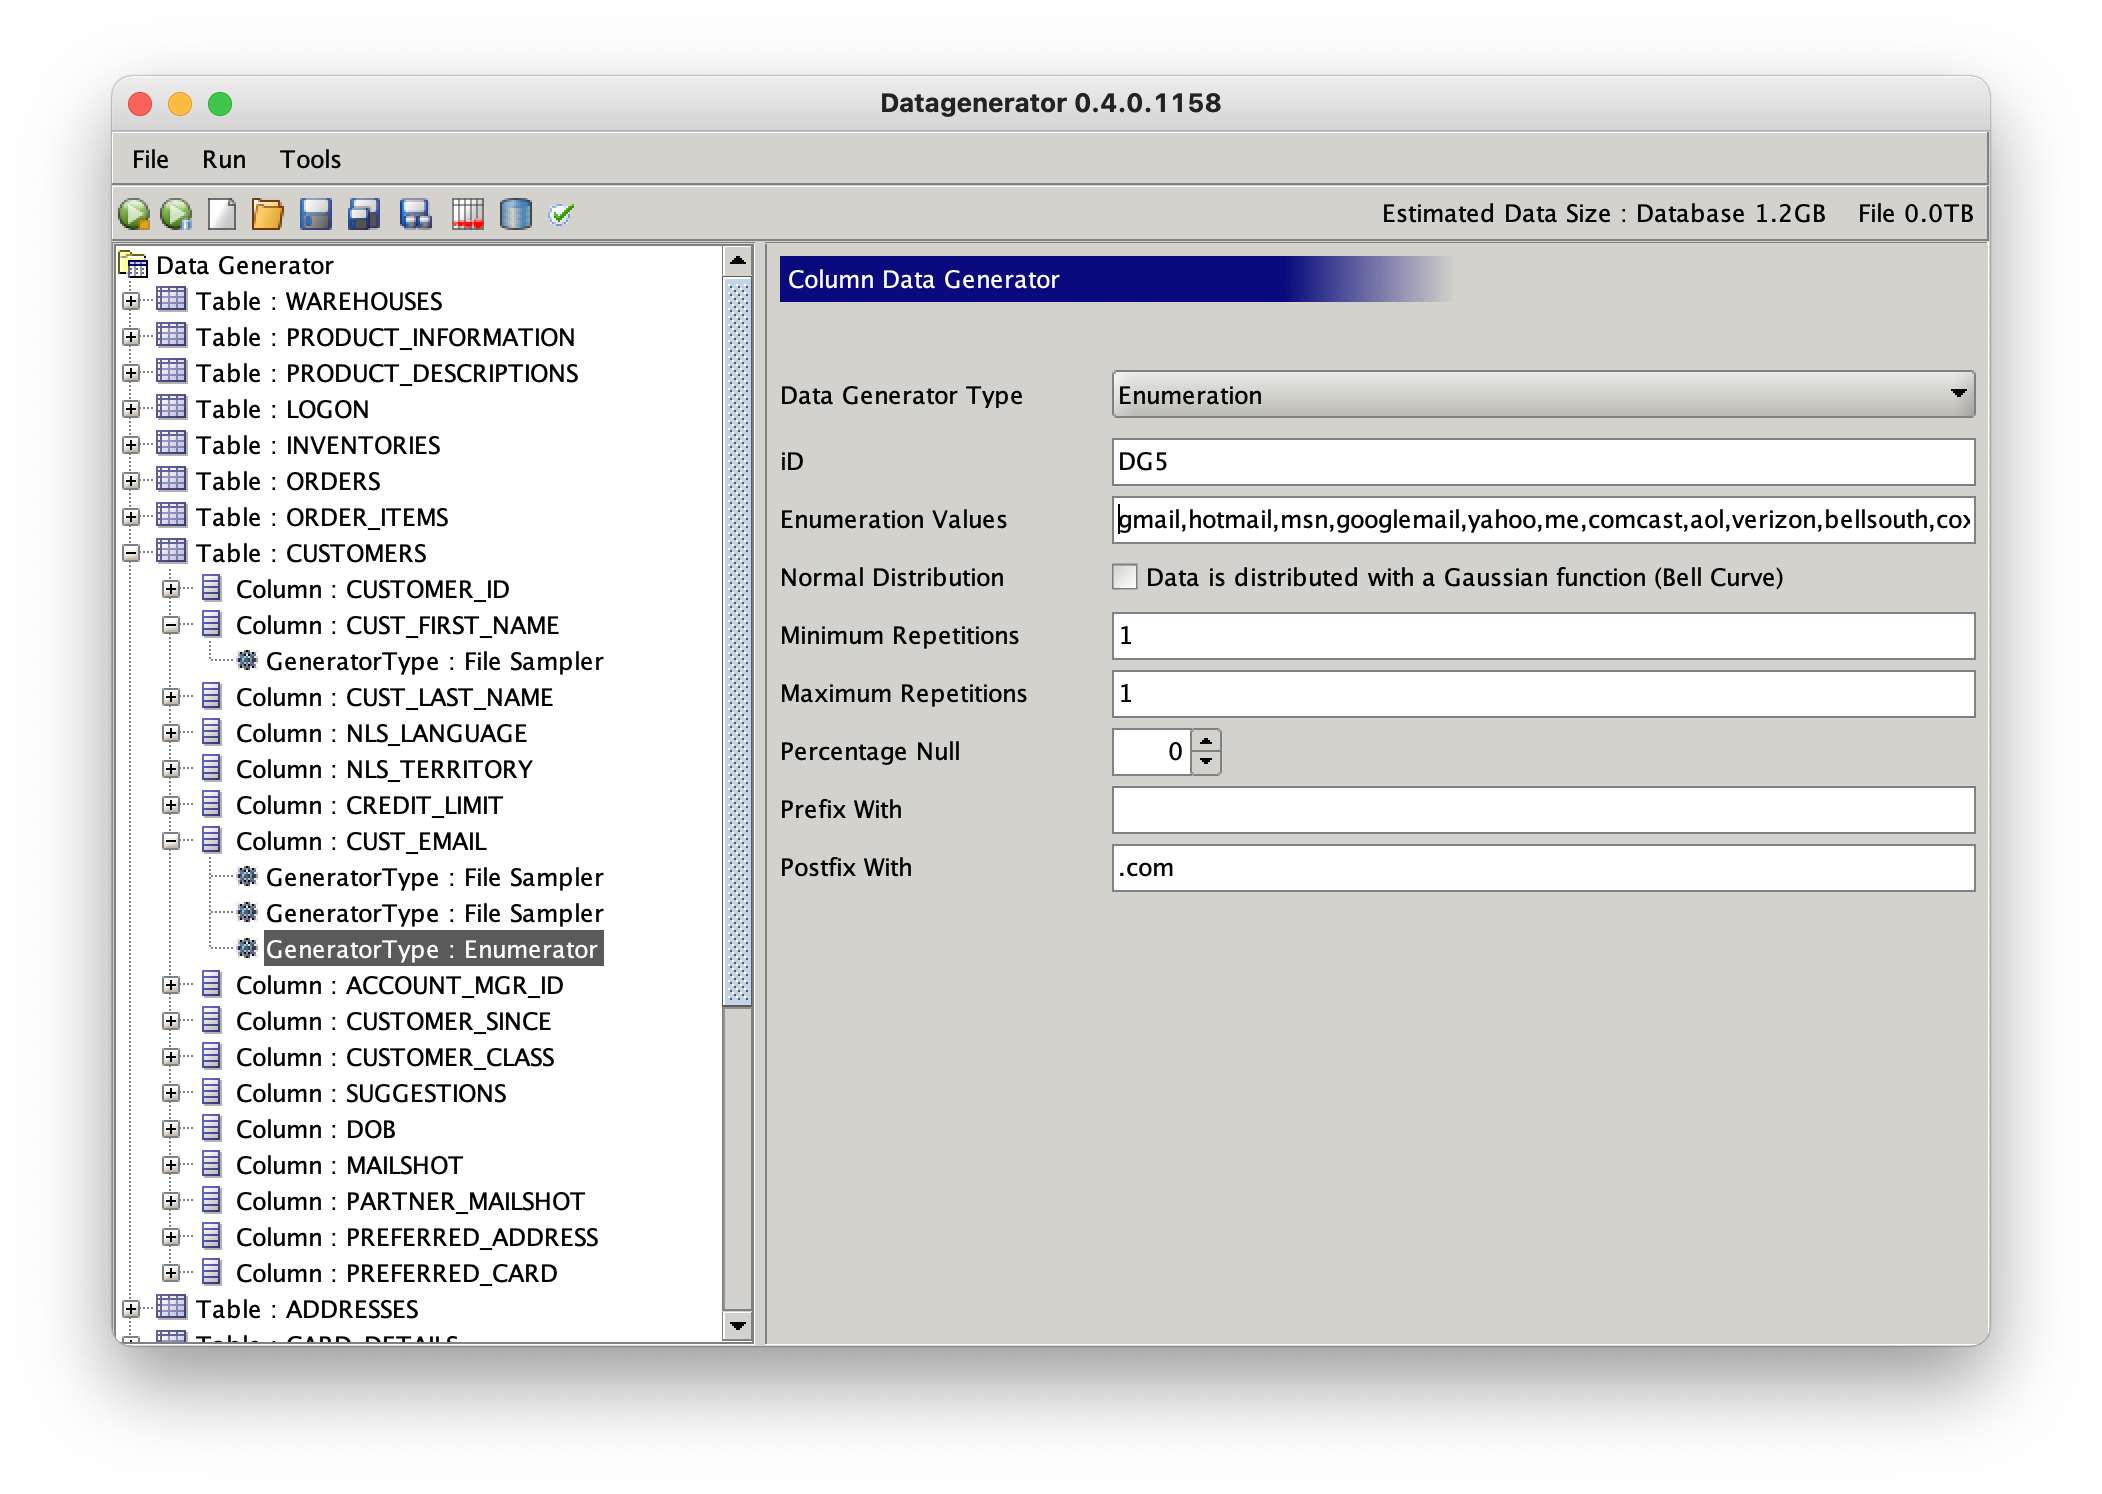
 Its also worth changing the email column to give it a more realistic size and data profile. Select and expand the “Cust_email” column. Change the existing datgenerator to type “File” and select populate it as before with the lowerfirstnames.txt. However this time also enter “@” in the postfix field. Its also possible to have multiple datgenerators per column. To add an additional datagenerator right click on the “Cust_email” column and select Add column generator.
Change this datagenerators type to enumerator and add some common ISP email endings. This will generate data in the form “john.smith@yahoo.com”
Parent Child Relationships
Datagenerator also allows for the creation of Parent/Child detail relationships between tables and will generate the appropriate foreign key data.
Select the “ORDER_ITEMS” table and select the “Model Parent Child Relationship” This will allow you to select the parent table (ORDERS), primary key (ORDER_ID) and foreign key (ORDER_ID). Its also possible to get a datagenerator to reset its value for each new primary key in the primary table, in this case the “LINE_ITEM_ID”.
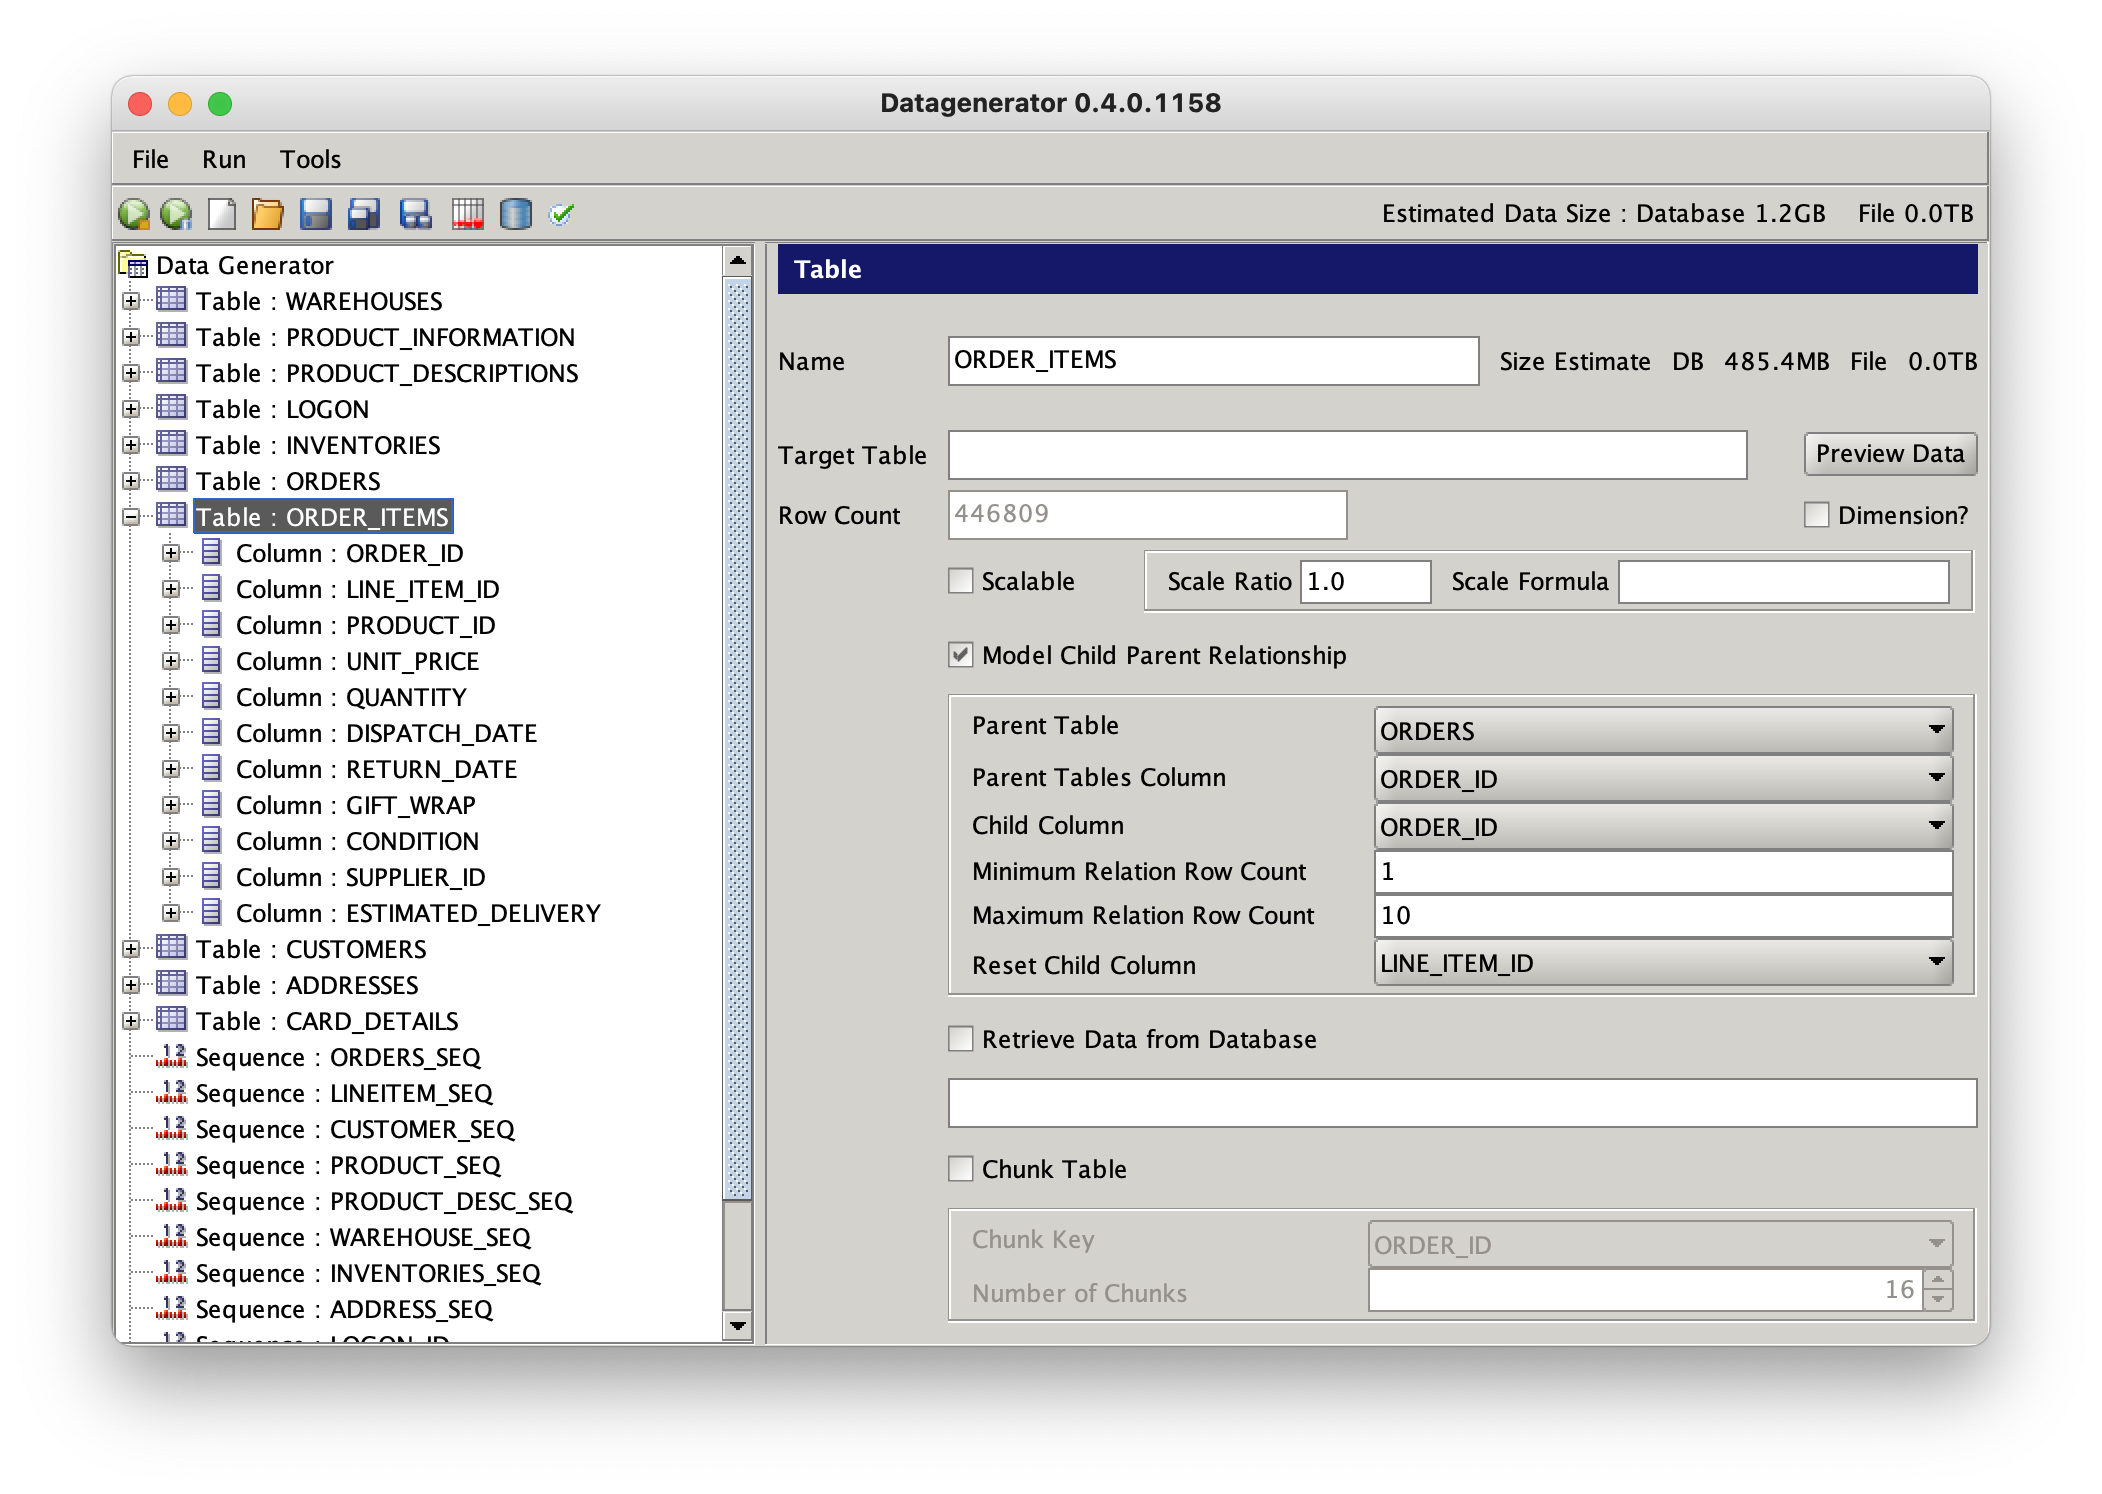
The amount of data created for a child table is directly related to the number of rows in the parent table and the minimum and maximum relationship count.
Once you’ve completed your changes its possible to save them using the “File” menu or the save icon.